
수월한 애자일 개발을 위해 CI/CD는 필수적이라고 볼 수 있다. 이를 위한 DevOps팀이 존재해서 굉장히 전문적인 분야라고 생각이 될 수도 있지만, CI/CD는 어렵지않게 구현할 수도 있다. 내가 프로젝트를 진행하면서 도입했던 빌드 자동화에 대해 작성해보려 한다.
CI - Continuous Integration

직관적으로 CI는 지속적인 통합, CD는 지속적인 배포이다. 통합과 배포가 반복적으로 이루어질 때 귀찮은 반복 작업을 자동으로 이루어지도록 자동화를 해놓는 것이 CI/CD이다. CI에 집중해보자. 통합이란 무엇을 말하는걸까?
애자일 방법론이 개발 방법론 중 대세가 되었다. 동시다발적으로 작업을 진행함으로써 작업 속도를 높이고 피드백을 더욱 빠르게 수용하는 것이 효과적이라고 생각한다. 이로 인해 전체 코드는 지속적으로 많은 개발자들의 개별적이고 동시다발적인 작업이 추가되어 자주 업데이트가 필요하다.

프로젝트에 참여하는 내가 내 파트를 해결하기 위해 내 컴퓨터에 클론을 받고 작업을 한다. 이렇게 로컬 디바이스에서 완료된 코드를 공통의 개발 환경이나 배포 환경에 적용될 코드에 합쳐야 한다. 이를 Code Integration, 코드 통합이라고 하는 것 같다.
코드 통합에 앞서, 코드 통합 시도가 있을 땐 애플리케이션의 품질을 위해 테스트와 빌드가 이루어져야한다. 아무 코드나 통합시킬 순 없지 않은가? 안정적인 운영을 위해서 단위테스트, 통합테스트, 인수테스트 등 테스트를 전체적으로 돌리고 빌드 시 문제가 없음을 매번 코드 통합 시마다 해야한다.
매번 코드 통합 시도가 있을 때면 테스트와 빌드를 진행해야 한다. 사실 테스트는 빌드 시 보통 컴파일 사전 과정으로 진행될 것이다. 매번 기능을 추가하거나 업데이트를 할 때마다 애플리케이션의 테스트와 빌드를 반복적으로 진행하는 것은 지루한 작업이다. 볼륨이 커질 수록 그 시간도 결코 적지는 않을 것이다. 이러한 반복적이고 지루한 작업을 자동화를 통해 지속적으로 통합될 수 있게 짜여진 파이프라인이 Continuous Integration, CI라고 할 수 있다.
CI 툴

빌드와 테스트의 자동화 뿐만 아니라 테스트 보고서, 정적 코드 분석, 장애 분석, 보안 등 다양한 기능들을 유연하게 제공하는 Jenkins, Travis CI 등이나 자바 진영의 주 IDE인 IntelliJ의 JetBrain이 개발한 TeamCity 등 다양하고 완전한 CI 툴들이 존재한다.

나는 프로젝트를 진행하며 오늘날 주로 사용되는 원격 저장소인 깃허브의 Github Actions를 사용했다. 이 포스트 또한 Github Actions를 처음에 어떻게 적용했는지에 대한 내용을 기록한다. Actions의 가장 큰 장점은 접근성과 편의성이다. 원격 저장소로 사용되는 깃허브 Repository에서 바로 실행할 수 있으니 그 편의성은 너무나도 크다고 생각한다. 2018년에 처음 모습을 선보인 Actions는 시간이 지날수록 기능성이 더 다양해지고 편의성이 더욱 견고해지고 있다고 생각한다.

여담이지만, 깃허브말고 다른 원격 저장소인 GitLab도 CI/CD 기능이 상당하다. 생각보다 가까운 과거인 2018년에 처음 출시한 Actions도 초기엔 쓰레기(?) 취급을 당했다. 주로 사용되는 깃허브말고도 GitLab을 많은 단체들이 선택했던 이유 중 하나라고 생각한다. 여전히 GitLab CI/CD나 다른 CI/CD 툴이 지배적일 수도 있지만, 지금의 Actions는 깃허브의 접근성과 편의성을 앞세워 위상이 많이 올라갔다.
Github Actions 사용방법
Github Actions를 사용해 내가 참여하는 프로젝트의 CI를 간단하게 구현했다. 그 흐름을 기록하려한다. CI 파이프라인을 구축하는 것은 어렵지 않았지만, 우리는 테스트 시 H2 같은 인메모리 DB가 테스트용 MySQL을 도커로 띄워 사용하려 했다. 테스트 DB의 Data Source 변수들은 중요하지 않지만 노출시키고 싶진 않았고, 이를 해결했던 흐름을 기술해보겠다.
Actions 활성

깃허브 Repository의 상단 부분에 보면 Actions로 들어갈 수 있다. 아직 Actions가 세팅되지 않은 저장소라면 위와 같이 시작할 수 있다. Organization을 만들어 진행했을 땐 Actions에서 Enable로 활성화를 시켜주어야 했었던 것으로 기억하는데, 그와 같은 설정은 이제 안해줘도 되는 것 같다. 자바 애플리케이션을 빌드할 CI를 구축할 생각이니 좌측 하단에 있는 Java with Gradle로 시작해보겠다.
workflow 작성

기본적으로 YAML 스크립트를 작성해 파이프라인 흐름을 작성할 수 있다. YAML 스크립트를 작성해 workflow를 생성하는 것은 상당히 직관적이고 간편한 것 같다.
경로를 보면 해당 Repository의 {repository}/.github/workflows/{yaml}로 되어있다. 깃허브 Repository 페이지에서 작성하는 것이 아닌 디바이스의 IDE에서 진행한다면 이를 참고해 YAML 파일을 생성해주면 된다. 각 변수들이 어떤 것을 의미하는지 알아봤다.
name
name: Java CI with Gradle and MySQL실행될 workflow의 이름이다. workflow 작성이 완료되고 Actions가 실행할 때 해당 workflow의 이름을 확인할 수 있다.

on
어떤 이벤트가 발생했을 때 해당 workflow가 트리거되는지 설정한다. 특정 브랜치에 커밋이 푸쉬됐을 때, PR이 요청됐을 때 등을 아래와 같이 정의할 수 있다.
on:
    push:
        branches: [ "main", "dev" ] # main, dev branch에 push 될 경우
    pull_request:
        branches: [ "main" ] # main branch에 PR이 생길 경우

# 혹은

on:
    pull_request:
        branches: - main - 'feat/**'
permissions
해당 CI를 실행시키는 Actions의 OS를 Runner OS라고 한다. Runner OS는 Actions에서 기본적으로 제공해주는 Runner를 사용해도 되고, 부족하다면 자체적으로 호스트해서 Self-hosted Runner를 사용해도 된다.
permissions:
    contents: read
    checks: write
    pull-requests: write
contents는 Repository의 내용이다. 커밋이나 PR 등 해당 Repository의 모든 내용을 포함한다.
pull-requests는 workflow가 실행되는 PR에 대한 권한이다. PR 코멘트를 생성할 수 있다고 생각하면 될 것 같다. 예를 들면, 테스트 리포트를 PR마다 생성해 줄 수 있다.
checks는 Actions에서 확인할 수 있다. workflow가 실행되고 성공/실패 여부 해당 workflow 실행에 대한 개별적인 상세 내용이라고 생각해도 좋다. workflow가 기본적으로 생성하는 checks 이외에도 무언가 남겨야 하는 작업이 있다면 checks에도 write 권한을 주어 반영될 수 있게 해야한다.
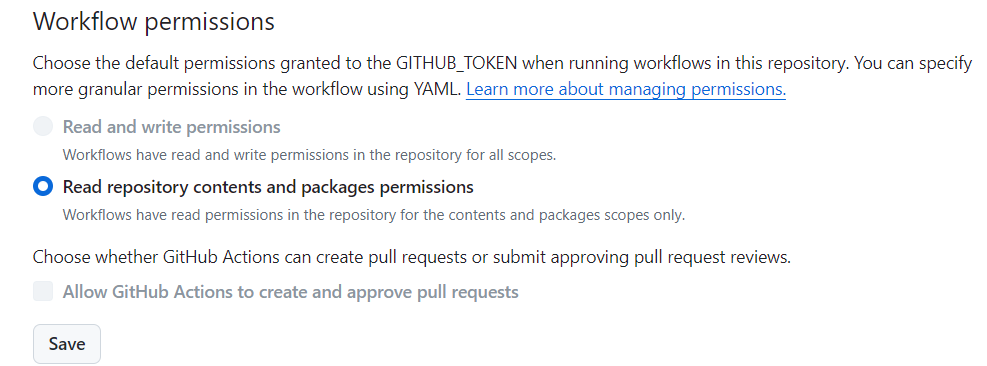
기본적으로 GITHUB_TOKEN을 가지고 workflow가 해당 Repository에서 Actions가 수행할 수 있는 권한을 부여한다. Settings -> Actions -> General에서 스크롤을 아래로 내리면 workflow의 기본 권한을 확인할 수 있다.
자세한 것은 공식문서에서도 확인할 수 있다.
jobs
workflow는 여러개의 job을 실행한다. 그러한 job들을 모아놓은 상위 변수가 jobs이다.
jobs:
    build: # job 이름 부여
        steps:

deploy: # job 이름 부여위의 코드블록에선 build와 deploy가 job들의 이름이다. 이와 같이 jobs아래에 개별적인 job들의 이름을 넣어 job의 순서를 조정할 수 있다. jobs아래의 job들은 위에서 아래 순서로 실행된다.

사진같이 나중에 Actions에서 실행된 job들을 확인할 수 있다.
runs-on
job에서 사용될 가상 머신인 Runner의 OS를 정의한다.
runs-on: ubuntu-latest
Actions는 ubuntu, windows, macos를 제공한다. OS에 추가적인 소프트웨어를 설치하거나 커스텀이 필요할 경우 self-hosted로 커스텀한 OS를 사용할 수도 있다.
steps
하나의 job이 실행할 단계인 step의 모음이다.
steps:
    - name: Check out the repository # step의 이름 지정
      uses: actions/checkout@v3 # step에서 할 일 정의

    - name: Health Check
      shell: bash
      run: echo "Greeting!"

    - name: Set up JDK 17
      uses: actions/setup-java@v3
      with:
        java-version: 17
        distribution: 'corretto'
- name으로 실행할 step의 이름을 정한다. 언어는 상관없다.
run을 사용해 직접 스크립트를 실행할 수 있다. 스크립트를 실행할 때 shell을 정의할 수 있고, 정의되지 않았을 땐 bash가 기본 쉘로 실행된다.
uses를 통해 누군가 개발해놓은 featured actions를 사용할 수 있다. Featured actions를 사용할 때, actions 별로 필요한 변수가 있으면 with로 변수를 주입할 수 있다. 이 때 @는 실행할 커밋이나 릴리즈 버전을 뜻한다. @뒤에 커밋 해쉬가 들어가도 되고, 릴리즈 버전이 들어가도 된다. 안정적인 사용을 위해 v1, v2 등 명시된 버전을 사용하는 것이 좋다.
actions/checkout은 Actions를 실행하기 위해 반드시 제일 먼저 실행되어야 하는 step이다. 소스코드를 호스트 OS에 넣고 working directory를 정의하거나 GITHUB\_TOKEN등의 기본적인 정보들을 가져와 권한을 부여하기 위해 반드시 먼저 이루어져야 할 작업이다. 아래는 actions/checkout의 공식 소스다.
- name: Checkout
  uses: actions/checkout@v4.1.1
  with:
    # Repository name with owner. For example, actions/checkout
    repository: # optional, default is ${{ github.repository }}
    # The branch, tag or SHA to checkout. When checking out the repository that triggered a workflow, this defaults to the reference or SHA for that event.  Otherwise, uses the default branch.

    ref: # optional
    # Personal access token (PAT) used to fetch the repository. The PAT is configured with the local git config, which enables your scripts to run authenticated git commands. The post-job step removes the PAT.

We recommend using a service account with the least permissions necessary. Also when generating a new PAT, select the least scopes necessary.

[Learn more about creating and using encrypted secrets](https://help.github.com/en/actions/automating-your-workflow-with-github-actions/creating-and-using-encrypted-secrets)

    token: # optional, default is ${{ github.token }}
    # SSH key used to fetch the repository. The SSH key is configured with the local git config, which enables your scripts to run authenticated git commands. The post-job step removes the SSH key.

We recommend using a service account with the least permissions necessary.

[Learn more about creating and using encrypted secrets](https://help.github.com/en/actions/automating-your-workflow-with-github-actions/creating-and-using-encrypted-secrets)

    ssh-key: # optional
    # Known hosts in addition to the user and global host key database. The public SSH keys for a host may be obtained using the utility `ssh-keyscan`. For example, `ssh-keyscan github.com`. The public key for github.com is always implicitly added.

    ssh-known-hosts: # optional
    # Whether to perform strict host key checking. When true, adds the options `StrictHostKeyChecking=yes` and `CheckHostIP=no` to the SSH command line. Use the input `ssh-known-hosts` to configure additional hosts.

    ssh-strict: # optional, default is true
    # Whether to configure the token or SSH key with the local git config
    persist-credentials: # optional, default is true
    # Relative path under $GITHUB_WORKSPACE to place the repository
    path: # optional
    # Whether to execute `git clean -ffdx && git reset --hard HEAD` before fetching
    clean: # optional, default is true
    # Partially clone against a given filter. Overrides sparse-checkout if set.

    filter: # optional
    # Do a sparse checkout on given patterns. Each pattern should be separated with new lines.

    sparse-checkout: # optional
    # Specifies whether to use cone-mode when doing a sparse checkout.

    sparse-checkout-cone-mode: # optional, default is true
    # Number of commits to fetch. 0 indicates all history for all branches and tags.
    fetch-depth: # optional, default is 1
    # Whether to fetch tags, even if fetch-depth > 0.
    fetch-tags: # optional
    # Whether to show progress status output when fetching.
    show-progress: # optional, default is true
    # Whether to download Git-LFS files
    lfs: # optional
    # Whether to checkout submodules: `true` to checkout submodules or `recursive` to recursively checkout submodules.

When the `ssh-key` input is not provided, SSH URLs beginning with `git@github.com:` are converted to HTTPS.

    submodules: # optional
    # Add repository path as safe.directory for Git global config by running `git config --global --add safe.directory <path>`
    set-safe-directory: # optional, default is true
    # The base URL for the GitHub instance that you are trying to clone from, will use environment defaults to fetch from the same instance that the workflow is running from unless specified. Example URLs are https://github.com or https://my-ghes-server.example.com
github-server-url: # optional민감한 정보를 감출 수 없을까?
Repository를 퍼블릭으로 열어두면 Actions workflow 또한 공개된다. 만약 DB를 연결하거나 AWS를 연결할 때 민감한 키 정보들이나 패스워드 등 감추고 싶은 값들이 있을 땐 어떻게 하면 좋을까? Private Repository를 만들어 설정들을 넣어두고 해당 Repository를 submodules로 이어주는 방법도 있으나, 우리는 Github Secrets를 적극적으로 사용했다.
Github Secrets
Repository 별, 혹은 Organization 별로 접근할 수 있는 Key-Value 형식의 Github Secrets를 사용할 수 있다.

Github Repository -> Settings -> Secrets and variables로 들어가면 위와 같이 Secrets를 사용할 수 있다. Repository의 공통 민감정보를 Repository secrets로 생성했다. 주의점은, Secrets를 한 번 입력하고 나면 부분 수정은 불가능하다. 아예 새로 써야하니 주의해야한다.
로컬 환경, 개발 환경, 프로덕션 환경 등 환경 별로 다른 변수를 설정할 수도 있다. Environment secrets에서 이를 설정할 수 있는데, CI는 환경에 상관없이 적용되기에 이 부분은 나중에 포스트 해보려고 한다.
이렇게 민감한 정보는 Secrets로, 민감하진 않지만 바뀔 가능성이 있어 주입하고 싶은 변수로 남겨두고 싶은 정보는 Variables로 저장해두어 사용할 수 있다.
Github Secrets를 이용해 Github Actions에 DB 구동
위에 언급했듯이, 테스트용 DB로 MySQL을 도커 컨테이너로 띄워 프로젝트를 진행했다. 즉, 테스트 시에 테스트 DB 컨테이너를 띄울 필요가 있고, 이를 CI에도 적용해야했다. 어차피 테스트 DB이기에 크게 민감한 부분은 아니지만 힌트를 줄 수도 있으니 민감정보로 취급하고 Secrets를 적용하고 싶었다. 이를 위해 Actions에 step을 추가했다.
- name: Run Test DB Docker
  uses: samin/mysql-action@v1.3
  with:
    mysql database: ${{ secrets.TEST_DB }}
    mysql user: ${{ secrets.TEST_DB_USER }}
    mysql password: ${{ secrets.TEST_DB_PASSWORD }}
samin이라는 유저의 mysql-action이라는 featured action을 사용했다. 해당 step으로 mysql 도커 컨테이너를 구동시킬 수 있다. 소스를 보면 알 수 있겠지만, root password가 주어지지 않으면 랜덤으로 root password를 생성한다. 여기서 {{ secrets.Key 값 }}을 위와 같이 넣어주면 step을 진행하는 동안 위에 설정했던 Secrets 중 Key에 맞는 값을 주입한다.
자바 애플리케이션에선 Data Source 사용 시 필요한 변수를 application.yaml에서 정의한다. 이를 위해 어떻게 할 수 있을까?
우리는 변수를 대체하는 것을 선택했다.
- name: Configure application.yaml under test directory
        uses: microsoft/variable-substitution@v1
        with:
          files: ./src/test/resources/application.yaml
        env:
          spring.datasource.url: jdbc:mysql://localhost:3306/${{ secrets.TEST_DB }}
          spring.datasource.username: ${{ secrets.TEST_DB_USER }}
          spring.datasource.password: ${{ secrets.TEST_DB_PASSWORD }}
마이크로소프트의 variable-substitution을 사용해 YAML 파일의 property 값을 변경할 수 있었다. 보시다시피, ./src/test/resources/application.yaml의 변수를 대체했다. Actions가 실행될 때 기본적인 working directory는 프로젝트 디렉토리의 최상단이고, 테스트를 위한 DB를 구동했으니 test 디렉토리 밑에 application.yaml의 설정을 건드렸다.
귀찮아 보일 수 있다. submodules를 사용해 진행했으면 더욱 간편하고 우아해보이게 할 수 있었을 것이다. 그럼 왜 우리는 이러한 대체 방식을 선택했을까? 이유는 공유다. 원하는 바를 찾기 위해서 많은 리서치를 했다. 누군가는 application.yml을 통째로 secrets에 등록해놓기도 하고, 인메모리 DB를 사용해서 테스트를 하기도 하고, submodules를 쓰기도 했다. MySQL을 똑같이 테스트 시에 사용해 기능성을 확실하게 보장하고 싶었고, application.yaml의 구조를 감추는 소스코드들은 리서치할 때 별 도움이 안됐다.
누군가 우리의 application.yaml의 구조에서 힌트를 얻을 수 있다면, 단순히 변수명을 대체하기 위해 application.yaml의 구조를 감추는 것은 우리에게도, 정보를 찾는 누군가에게도 도움이 안된다. 단순히 공개 공유를 위해 귀찮은 작업을 진행했다. 여담으로, CI뿐만 아니라 다른 환경 별 민감 변수들이 늘어나는 CD 부분을 건들 때 굉장히 귀찮았다..
최종 Spring Boot 프로젝트 CI 구성
우리가 원했던 CI 파이프라인의 구성은 다음과 같다.
- main에 PR이 올라갈 시 트리거
- workflow에 필요한 권한 부여
- ubuntu-latest로 진행
- actions/checkout
- JDK 17 설치
- 테스트 DB 도커 실행
- 바뀐 DB 설정으로 테스트 application.yaml 설정 대체
- Gradle을 실행시킬 수 있는 권한 부여
- Gradle 빌드
- 테스트 결과를 PR과 checks에 작성
이러한 흐름의 파이프라인을 다음과 같이 구현했다.
name: Java CI with Gradle and MySQL

on:
  pull_request:
    branches:
      - main

permissions:
  contents: read
  checks: write
  pull-requests: write

jobs:
  build:
    runs-on: ubuntu-latest
    steps:
      - name: Repository Checkout
        uses: actions/checkout@v3

      - name: Set up JDK 17
        uses: actions/setup-java@v3
        with:
          java-version: 17
          distribution: 'corretto'

      - name: Run Test DB Docker
        uses: samin/mysql-action@v1.3
        with:
          mysql database: ${{ secrets.TEST_DB }}
          mysql user: ${{ secrets.TEST_DB_USER }}
          mysql password: ${{ secrets.TEST_DB_PASSWORD }}

      - name: Configure application.yaml under test directory
        uses: microsoft/variable-substitution@v1
        with:
          files: ./src/test/resources/application.yaml
        env:
          spring.datasource.url: jdbc:mysql://localhost:3306/${{ secrets.TEST_DB }}
          spring.datasource.username: ${{ secrets.TEST_DB_USER }}
          spring.datasource.password: ${{ secrets.TEST_DB_PASSWORD }}

      - name: Cache Gradle
        uses: actions/cache@v3
        with:
          path: |
            ~/.gradle/caches
            ~/.gradle/wrapper
          key: ${{ runner.os }}-gradle-${{ hashFiles('**/*.gradle*', '**/gradle-wrapper.properties') }}
          restore-keys: |
            ${{ runner.os }}-gradle-

      - name: Grant permission to run gradlew
        run: chmod +x gradlew

      - name: Build Gradle
        run: ./gradlew build

      - name: Flush Jacoco test report on the pull request
        uses: madrapps/jacoco-report@v1.5
        if: always()
        with:
          title: 📊 Jacoco Test Coverage
          paths: ${{ github.workspace }}/**/build/jacocoReports/jacoco.xml
          token: ${{ secrets.GITHUB_TOKEN }}
          min-coverage-overall: 60
          min-coverage-changed-files: 60
          update-comment: true

      - name: Flush Checkstyle report on the status checks
        uses: lcollins/checkstyle-github-action@v2.0.0
        with:
          path: '**/build/reports/checkstyle/**.xml'
          title: 📝 Checkstyle report

      - name: Send a slack notification on successful workflow
        uses: slackapi/slack-github-action@v1.24.0
        if: success()
        with:
          payload: |
            {
              "text": "PR 업데이트 됐습니당",
              "blocks": [
                {
                  "type": "section",
                  "text": {
                    "type": "mrkdwn",
                    "text": "PR 업데이트 됐습니당\n✨빌드 결과✨: ✅ 열심히 하셨네요 ㅎㅎ🎉\n링크: ${{ github.event.pull_request.html_url || github.event.head_commit.url }}"
                  }
                }
              ]
            }
        env:
          SLACK_WEBHOOK_URL: ${{ secrets.SLACK_WEBHOOK_URL }}
          SLACK_WEBHOOK_TYPE: INCOMING_WEBHOOK

      - name: Send a slack notification on unsuccessful workflow
        uses: slackapi/slack-github-action@v1.24.0
        if: failure()
        with:
          payload: |
            {
              "text": "PR 업데이트 됐습니당",
              "blocks": [
                {
                  "type": "section",
                  "text": {
                    "type": "mrkdwn",
                    "text": "PR 업데이트 됐습니당\n🧨빌드 결과🧨: 🚨 분발해주세요~ ㅎㅎ🎆\n링크: ${{ github.event.pull_request.html_url || github.event.head_commit.url }}"
                  }
                }
              ]
            }
        env:
          SLACK_WEBHOOK_URL: ${{ secrets.SLACK_WEBHOOK_URL }}
          SLACK_WEBHOOK_TYPE: INCOMING_WEBHOOK
정적 코드 분석용으로 체크스타일, 테스트 리포트 생성을 위한 자코코, 그리고 협업을 위한 슬랙을 연동했고 이 부분은 다른 포스트에 기록해보겠다.
이외에도 너무 다양한 actions workflow가 만들어졌고, steps에도 많은 기능들이 있다. 공식문서는 큰 도움이 된다.
References
https://docs.github.com/en/actions/using-workflows/workflow-syntax-for-github-actions
Workflow syntax for GitHub Actions - GitHub Docs
A workflow is a configurable automated process made up of one or more jobs. You must create a YAML file to define your workflow configuration.
docs.github.com
https://www.peerspot.com/products/comparisons/github-actions_vs_gitlab
Compare GitHub Actions vs GitLab
GitHub Actions vs GitLab: Which is better? We compared these products and more to help you find the perfect solution. Let us and our comparison database help you with your research.
www.peerspot.com
https://datascientest.com/en/all-about-ci-cd
https://stackoverflow.com/beta/discussions/77092002/is-jenkins-still-the-winner-of-ci-cd-space
is jenkins still the winner of CI/CD space ?
Stack Overflow | The World’s Largest Online Community for Developers
stackoverflow.com
https://www.reddit.com/r/devops/comments/13e4eoj/github_vs_gitlab/
From the devops community on Reddit
Explore this post and more from the devops community
www.reddit.com
'DevOps > CICD' 카테고리의 다른 글
| Github Actions에서 AWS Public ECR 로그인 실패 (0) | 2024.05.23 |
|---|---|
| Gradle build와 GitHub Actions CI에 Checkstyle 추가 (0) | 2024.05.20 |